Google 地圖 ( 原理 )
在行車記錄器與網路發達的年代,應該都有用過 Google Maps,甚至也看過許多把感測器資訊拋到 Google Maps 上頭顯示的實例 ( 目前最夯的大概就是 PM2.5 ),接下來兩篇將會實作 Google Maps 和 Webduino 的應用,並且在上頭顯示開關燈資訊,例如某地的電燈打開了,在地圖上的小燈泡也會跟著打開,甚至點選地圖上的小燈泡,也可以控制那個地方真正的燈泡!
這篇將會介紹基本的控制原理 ( 啟用 API、金鑰、基礎地圖操控、加入地址資訊 ),當我們已經熟稔 Google 地圖的用法後,下一篇就會透過 Webduino 將燈泡資訊顯示在地圖上。
啟用 API
要使用 Google Maps 首先要進入 Google API Console,在上面 Google 提供了各式各樣的服務,而且每種服務都有提供一個以上的 API 讓開發者使用。
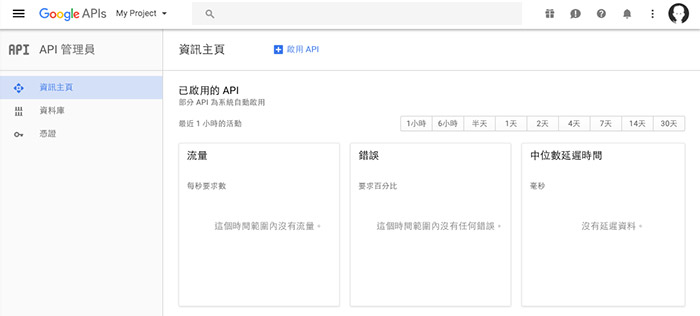
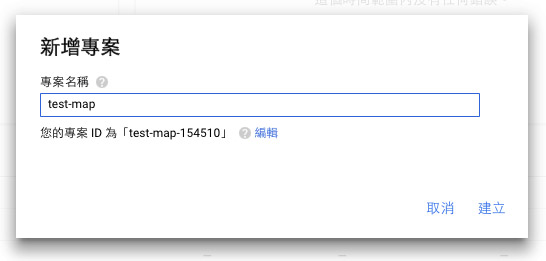
登入進去之後,建立一個專案。
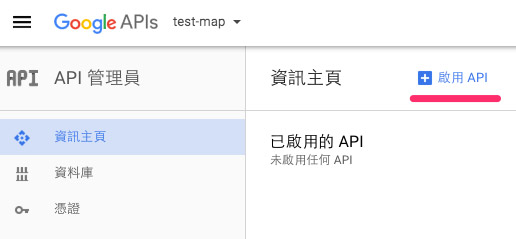
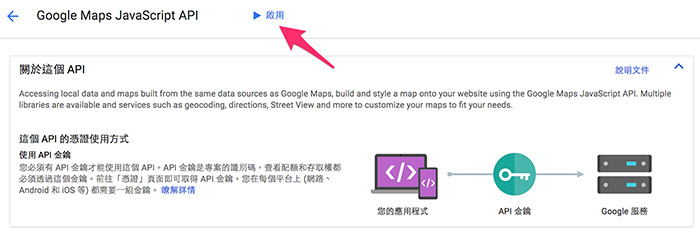
專案建立之後,點選「啟用 API」,新增我們在地圖操作所需的 API。
這裡要使用的是「Google Maps JavaScript API」和「Google Maps JavaScript API」,Google Maps JavaScript API 是主要的 API,Google Maps JavaScript API 則是幫我們轉換地點。( 不然就只能輸入經緯度 )
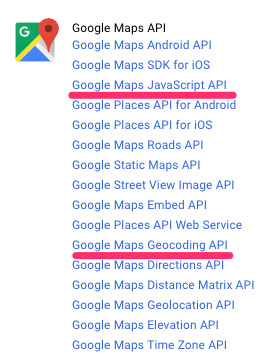
點選 API 名稱將其一一啟用。
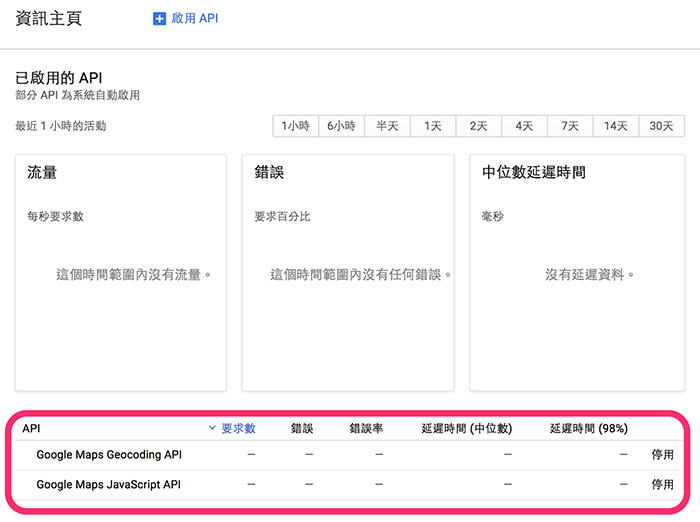
資訊主頁的下方會顯示啟用了哪些 API。
申請憑證
接著就是要申請憑證,畢竟 Google 也是要賺錢,不會讓你白白用他的服務。( 不過一定的流量內的確是讓你白白用沒錯ㄎㄎ )
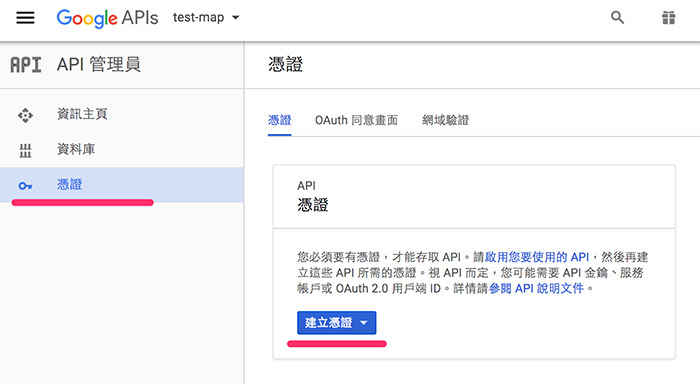
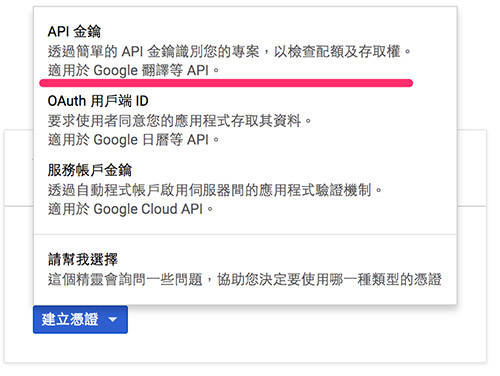
這邊我選擇第一個,建立 API 金鑰,也就是只要有這個金鑰就可以使用剛剛的 API 了。
為了安全性起見,通常都會勾選下面的一些設定。
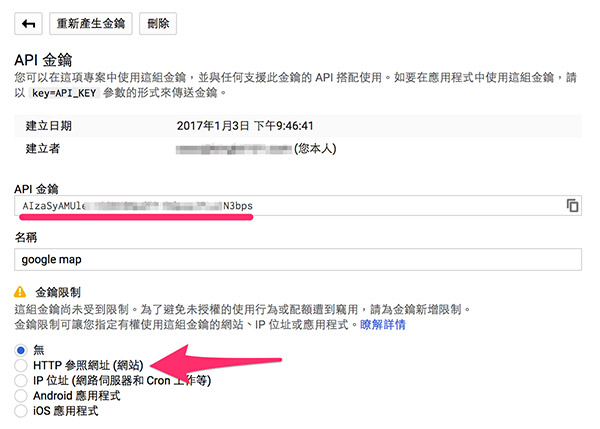
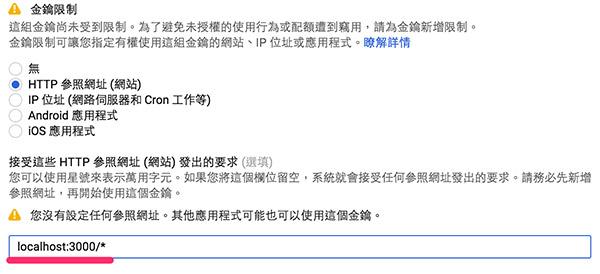
如果你要在本地端測試,可以勾選 HTTP 參照網址,允許 localhost:3000/* 即可。( port 自訂 )
地圖操作
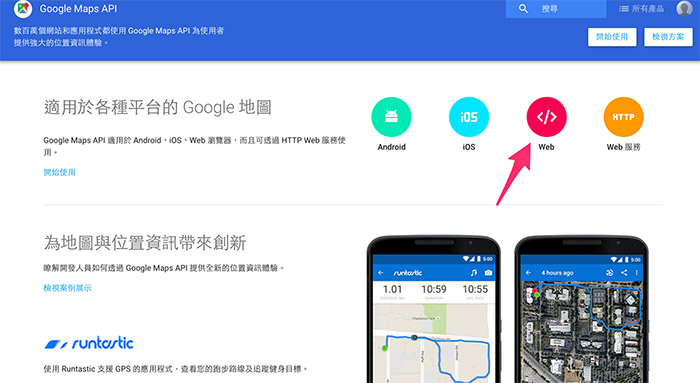
要使用 Google 地圖除了剛剛的 API 與金鑰之外,最重要的就是閱讀開發者網站:Google Maps API,裡面提供相當多的 API 用法以及範例介紹,因為我們是使用 Web 控制,就直接點選 Web 進入。
首先我們來做第一個範例,在畫面上放入一個 div 載入地圖,接著透過 .Map 的方法定義中心點,lat 是緯度 latitude,lng 是經度 longitude,zoom 數字越大放越大,而最下面的 Script 就是你的金鑰以及要執行的流程名稱。
參考:https://developers.google.com/maps/documentation/javascript/tutorial?hl=zh-tw
<html>
  <head>
    <style type="text/css">
      html, body { height: 100%; margin: 0; padding: 0; }
      #map { height: 100%; }
    </style>
  </head>
  <body>
    <div id="map"></div>
    <script type="text/javascript">

    var map;
    function initMap() {
      map = new google.maps.Map(document.getElementById('map'), {
        center: {lat: 25.04, lng: 121.512},
        zoom: 18
      });
    }

    </script>
    <script async defer
      src="https://maps.googleapis.com/maps/api/js?key=你的金鑰&callback=initMap">
    </script>
  </body>
</html>
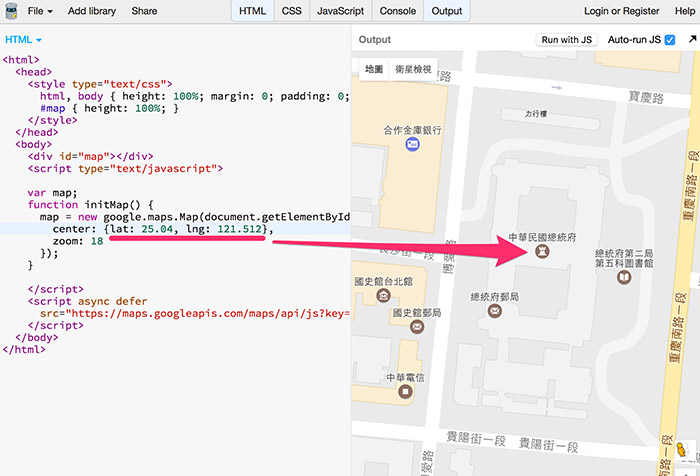
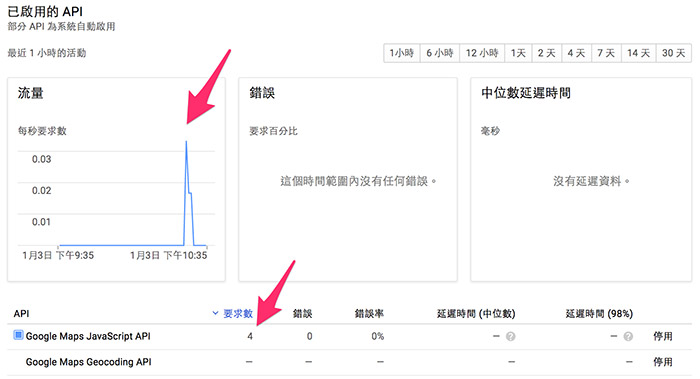
當你執行這個網頁的時候,回到 API 管理員裡面,就可以看到取用的次數,基本上一般使用都不會爆量,當然如果爆量就不能用了,或是要花錢買更大的數量來使用。
加入地圖標記 Marker
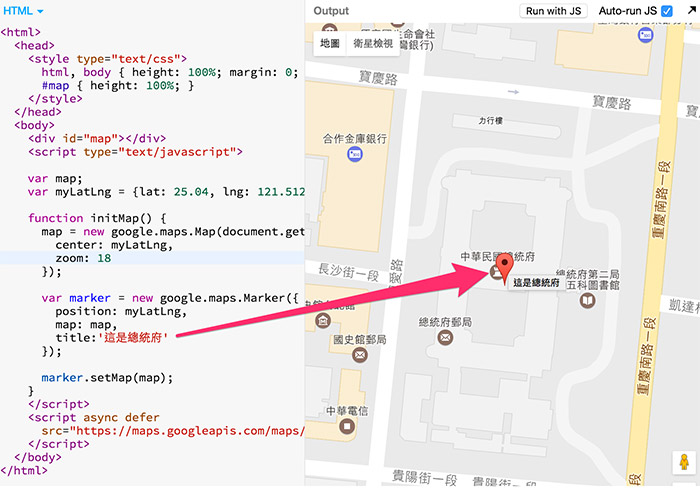
會使用地圖之後,接著來試試看在地圖裡加入「Marker」,因為會共用到經緯度,所以用一個變數來裝經緯度的物件,然後這裡會透過 new google.maps.Marker 的方法來新增一個 marker 到地圖上。
var map;
var myLatLng = {lat: 25.04, lng: 121.512};

function initMap() {
  map = new google.maps.Map(document.getElementById('map'), {
    center: myLatLng,
    zoom: 18
  });

  var marker = new google.maps.Marker({
    position: myLatLng,
    map: map,
    title:'這是總統府'
  });

  marker.setMap(map);
}
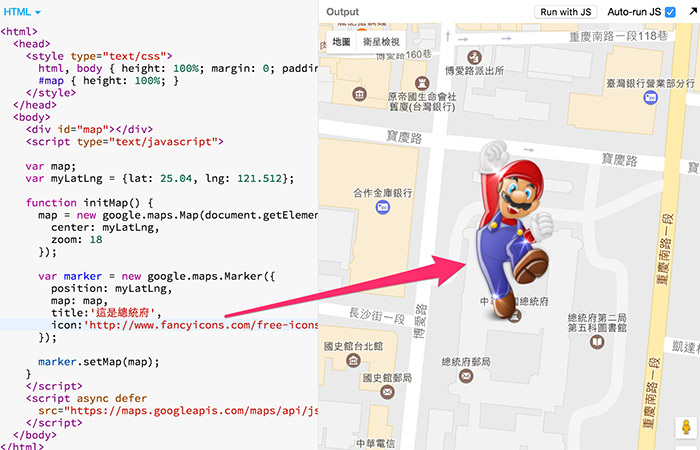
也可以透過 marker 的屬性 icon 來指定 marker 的圖片。
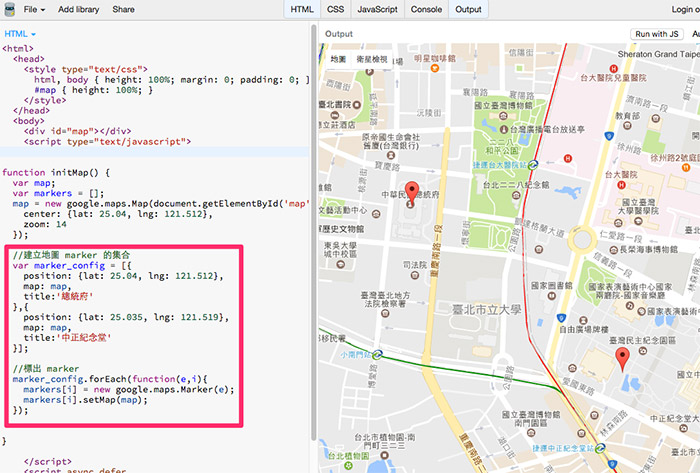
如果把 marker 集合成一個陣列,就可以標記多個 marker 在地圖上。( 如果使用 .setMap(null) 就可以清除該 marker )
function initMap() {
  var map;
  var markers = [];
  map = new google.maps.Map(document.getElementById('map'), {
    center: {lat: 25.04, lng: 121.512},
    zoom: 14
  });

  //建立地圖 marker 的集合
  var marker_config = [{
    position: {lat: 25.04, lng: 121.512},
    map: map,
    title:'總統府'
  },{
    position: {lat: 25.035, lng: 121.519},
    map: map,
    title:'中正紀念堂'
  }];

  //標出 marker
  marker_config.forEach(function(e,i){
    markers[i] = new google.maps.Marker(e);
    markers[i].setMap(map);
  });
}
資訊視窗 Info windows
Info windows 是在點選 maker 的時候會彈出來的資訊視窗,透過 new google.maps.InfoWindow 可以建立一個新的資訊視窗,內容就是純 HTML,可以用 CSS 控制,亦可放入圖片。
var contentString = ‘網頁內容’; //要顯示的 HTML 內容

var infowindow = new google.maps.InfoWindow({
  content: contentString
});

marker.addListener('click', function() {
  infowindow.open(map, marker); //設定點選 marker 打開資訊視窗事件
});
同樣的可以用一個陣列,放入多組不同的內容,是其對應到不同的 marker 裡面。
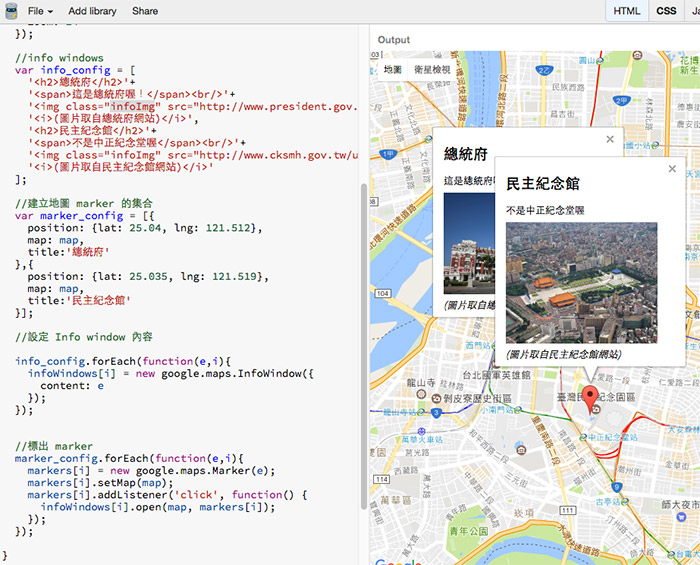
加入地址資訊,輸入地址就可標記位置
透過 google.maps.Geocoder() 可以解析地址,將地址轉換成對應的經緯度,回傳之後存在 results[0].geometry.location 內,就可以標記出對應的地點。
參考:https://developers.google.com/maps/documentation/javascript/geocoding?hl=zh-tw
var geocoder = new google.maps.Geocoder();
geocoder.geocode( { 'address': address}, function(results, status) {
  if (status == google.maps.GeocoderStatus.OK) {
    map.setCenter(results[0].geometry.location);
    var marker = new google.maps.Marker({
        map: map,
        position: results[0].geometry.location
    });
  } else {
    alert("Geocode was not successful for the following reason: " + status);
  }
});
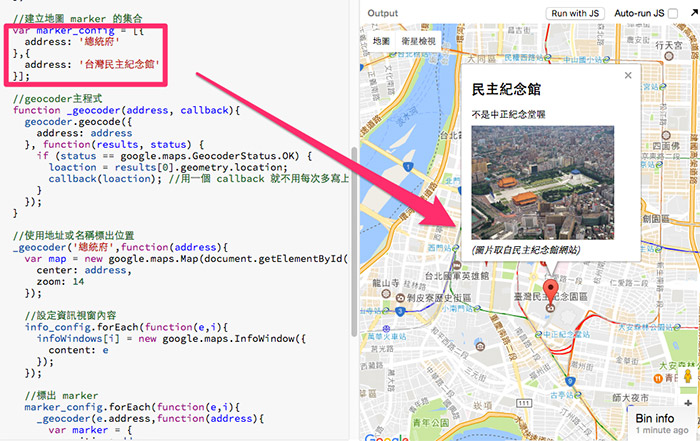
不過因為每次都要寫這樣一段實在有點複雜,原本是想要用 return 把地址轉出來的經緯度吐出來,不過發現沒辦法,所以這邊用一個流程 _geocoder 把它包起來,裡面包含一個 callback 的流程,這樣就可以重複利用了。
function initMap() {
  var markers = [];
  var infoWindows = [];
  var loaction;
  var geocoder = new google.maps.Geocoder();
  var info_config = [
    '<h2>總統府</h2>'+
    '<span>這是總統府喔!</span><br/>'+
    '<img class="infoImg" src="http://www.president.gov.tw/Portals/0/images/PresidentOffice/BeautyBuliding/President/m_000064_342436.jpg"><br/>'+
    '<i>(圖片取自總統府網站)</i>',
    '<h2>民主紀念館</h2>'+
    '<span>不是中正紀念堂喔</span><br/>'+
    '<img class="infoImg" src="http://www.cksmh.gov.tw/upload/article/4248b77496baac99a290f6f202bfe786.jpg"><br/>'+
    '<i>(圖片取自民主紀念館網站)</i>'
  ];

  //建立地圖 marker 的集合
  var marker_config = [{
    address: '總統府'
  },{
    address: '台灣民主紀念館'
  }];

  //geocoder主程式
  function _geocoder(address, callback){
    geocoder.geocode({
      address: address
    }, function(results, status) {
      if (status == google.maps.GeocoderStatus.OK) {
        loaction = results[0].geometry.location;
        callback(loaction); //用一個 callback 就不用每次多寫上面這段
      }
    });
  }

  //使用地址或名稱標出位置
  _geocoder('總統府',function(address){
    var map = new google.maps.Map(document.getElementById('map'), {
      center: address,
      zoom: 14
    });

    //設定資訊視窗內容
    info_config.forEach(function(e,i){
      infoWindows[i] = new google.maps.InfoWindow({
        content: e
      });
    });

    //標出 marker
    marker_config.forEach(function(e,i){
      _geocoder(e.address,function(address){
        var marker = {
          position:address,
          map:map
        }
        markers[i] = new google.maps.Marker(marker);
        markers[i].setMap(map);
        markers[i].addListener('click', function() {
          infoWindows[i].open(map, markers[i]);
        });
      });
    });
  });

}
完整程式碼,記得要填入金鑰:http://bin.webduino.io/moro/1/edit?html,output
小結
今天的重點大致上就到這邊,如果你前面都有實作出來,基本上就已經可以隨心所欲的操控地圖了。
下一篇將會透過 Webduino,實際把燈泡和 Google 地圖結合,如果沒有先透過這篇的原理介紹,實際上要合併的時候,腦袋就會冒出許多問號了。
參考:
聯絡我們
如果對於 Webduino 產品有興趣,歡迎透過下列方式購買:
個人線上購買:https://store.webduino.io/ ( 支援信用卡、超商取貨付款 )
企業&學校採購:來信 [email protected] 或來電 07-3388511。
如果對於這篇教學有任何問題或建議,歡迎透過下列方式聯繫我們:
Email:[email protected] ( 如對於產品有使用上的問題,建議透過 Email 附上照片或影片聯繫 )
Facebook 粉絲團:https://www.facebook.com/webduino/
Facebook 技術討論社團:https://www.facebook.com/groups/webduino/
 Webduino 學習手冊